13/01/2024 • 4 Minute Read
Simple Graph Database Setup with Neo4j and Docker
A Tutorial on Neo4j Docker Configuration, Environment Variables, and Memory Management

Databases
Graphs
Docker
Neo4j
Tutorial
Creating a graph database in Neo4j is a simple process with the help of Docker Compose.
This tutorial will run you through the following steps to get your Neo4j instance up:
- Creating the Docker Compose Files
- Adding an Environment Variables File for your Password
- Running your Neo4j using your Docker Compose file
Creating the Docker Compose Files
Create a docker-compose.yml file and copy the following snippet into it:
services:
  neo4j:
    container_name: neo4j
    image: neo4j:latest
    ports:
      - 7474:7474
      - 7687:7687
    environment:
      - NEO4J_AUTH=neo4j/${NEO4J_PASSWORD}
      - NEO4J_apoc_export_file_enabled=true
      - NEO4J_apoc_import_file_enabled=true
      - NEO4J_apoc_import_file_use__neo4j__config=true
      - NEO4J_PLUGINS=["apoc", "graph-data-science"]
    volumes:
      - ./neo4j_db/data:/data
      - ./neo4j_db/logs:/logs
      - ./neo4j_db/import:/var/lib/neo4j/import
      - ./neo4j_db/plugins:/plugins
Note the APOC (Awesome Procedures on Cypher) and Graph Data Science plugins are not required to run Neo4j. However, they are quite useful and I have used them in most of my own Neo4j projects so I included them here.
If you do not wish to have the Graph Data Science plugin, delete it from the NEO4J_PLUGINS list and if you wish to remove the APOC plugin delete every line that includes the word APOC. Note that the APOC plugin is required to run the Graph Data Science plugin.
Creating a Docker Compose Override for your Memory Configuration
Next create a file called docker-compose.override.yml. If you are unfamiliar with this override file that’s ok. It is simply a way to be able to modify your original docker-compose.yml file with certain parameters when you run it.
This is particularly useful when you would like a certain part of your configuration to be different, on different systems you may run your container on.
For example in the case of Neo4j, you may wish to set your memory limit to a different value on your laptop than on your desktop or production server.
Copy the following into the docker-compose.override.yml:
services:
  neo4j:
    environment:
      - NEO4J_server_memory_heap_initial__size=6G
      - NEO4J_server_memory_heap_max__size=6G
If you are using git for version control I would recommend adding the docker-compose.override.yml file to your .gitignore file and creating a file called docker-compose.override.example.yml. From which you can copy and paste the example and rename it to docker-compose.override.yml.
This serves enables you to commit the parameters in the configuration you would like to change, but not the values of those parameters. This in turn avoids overriding different memory limit values from different machines.
Check System and Docker Memory Constraints
But how do you know what the NEO4J_server_memory_heap_initial__size and NEO4J_server_memory_heap_max__size variables should be set to?
Firstly, I’d recommend just setting them to the same value of whatever you pick.
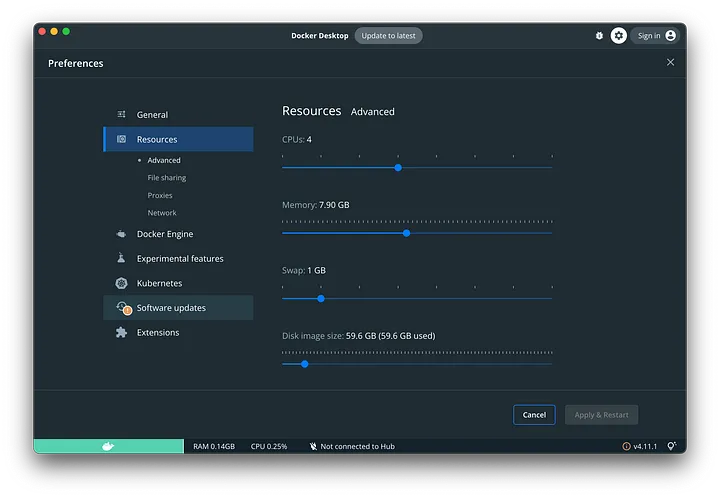
Secondly, I suggest checking your memory limit in the Docker Desktop app and if you are using WSL2 (Windows Subsystem for Linux) in WSL2.
You can check the memory limit in Docker Desktop by clicking the settings icon in the top right and then clicking on the resources tab. As you can see mine is current set to 7.90 GB. If you would like to change your memory limit for free to do so, just remember what you set it to.

If you like to view your memory limit in WSL2 and possibly change it, I’d recommend following this tutorial:
WSL2 Memory Sizing - Increasing or decreasing the memory available to WSL2
Now that you know the memory limit you have for Docker, you can set the heap memory size to any value under that limit you would like.
I would recommend testing out some different memory sizes to ensure you can run the container stably.
Adding an Environment Variables File for your Password
Environment variable files are used to store secrets for your application(s). For this tutorial, the only secret we have is the password of the Neo4j user.
Create a file called .env and copy the following into it:
NEO4J_PASSWORD=<your password>Then replace <your password> with the password you would like to use.
Again, you can use the strategy of creating a .env.example and gitignoring .env like we did with the docker compose override, if you are using git.
Running your Neo4j using your Docker Compose file
Finally, you can run the Neo4j docker container by entering the following command:
docker compose up -dPlease ensure your shell is in the same directory in which you created your docker-compose.yml file.
Now you can access the Neo4j browser by going to http://localhost:7474 and entering your username and password.
If you would like to learn how to import your own custom CSV dataset into Neo4j and how to query it using Cypher, please check out my profile and if you appreciate the content click the follow button. Thank you!